Gothic Tunnel Greenhouse
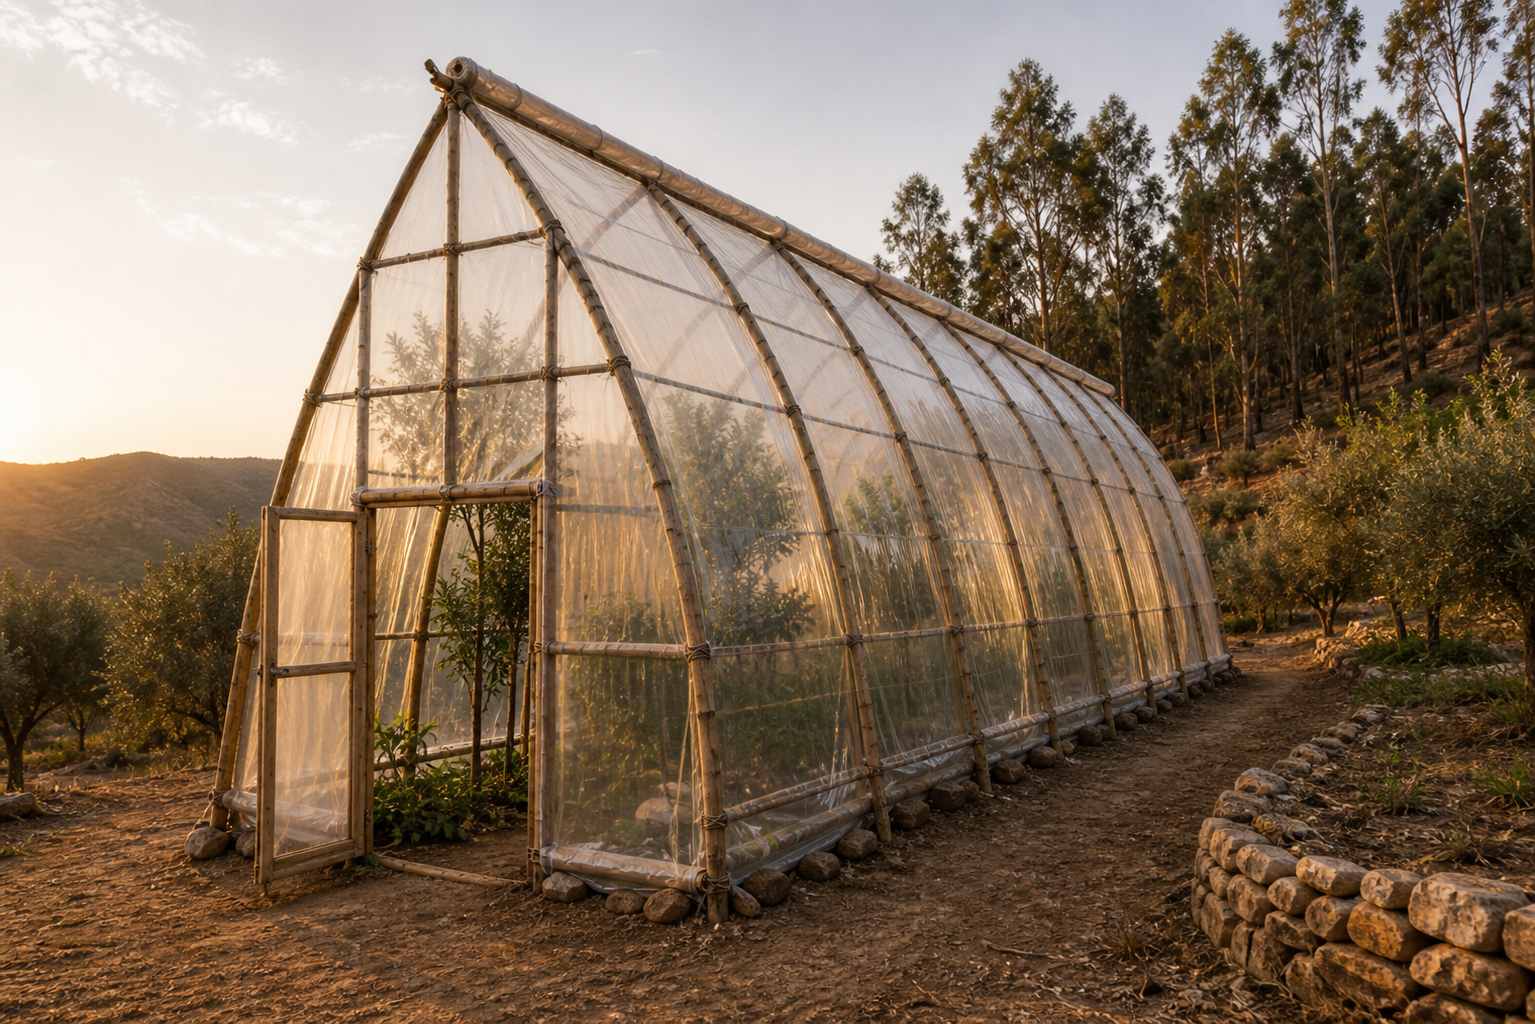
A 3m × 10m gothic-arch tunnel greenhouse with a 6.5m pointed apex — tall enough for citrus, banana, papaya, or other small fruit trees grown indoors. The frame is built from 6 pairs of long eucalyptus poles, each pair meeting at a sharp gothic point. Two off-the-roll 8m × 10m plastic sheets cover the structure — one on each slope — meeting at the apex with a 30cm continuous ridge vent that runs the full 10m length. The ridge vent eliminates the overheating that kills sealed plastic tunnels in summer.
How It Works
Section titled “How It Works”The frame is built from 6 gothic arches, each made of two long eucalyptus poles meeting at a sharp point. The poles’ butt ends sit in postholes along two parallel rows, 3m apart, with arches spaced 2m on-centre along the 10m length. The thin ends rise vertically for ~1m, then bend inward and upward, crossing at the apex 6.5m above the ground.
Two parallel ridge poles run the full length of the tunnel, lashed to opposite faces of each apex crossing. The ~30cm gap between them is the ridge vent — covered by a hinged plastic cap that’s lashed to one ridge pole and drops over the other to close. Six longitudinal purlins — three per side — span between the arches at hip, shoulder, and below-apex heights, supporting the plastic and locking the arches together.
The two main plastic sheets each cover one slope: 8m runs from ground level up and over its own ridge pole; 10m runs along the tunnel length. Battens lashed to the purlins sandwich the plastic without punctures. Gable ends are framed with diagonal infill poles and clad in any spare plastic, shade cloth, or reused tarp.
Why so tall:
- Fits citrus and small fruit trees. A semi-dwarf grapefruit (3–4.5m) clears the centre easily, with growing room. A standard kumquat or Meyer lemon disappears into the volume.
- Stack effect ventilation. The 6.5m apex with a continuous ridge vent creates a strong stack — hot air rises and exits along the full 10m, pulling cool air in through the doors and lower walls. No fans needed.
- Light from above. With a tall narrow profile, sunlight hits leaves from a much higher angle through the day — better for tropical-feeling plants that want overhead light.
What you need:
- Site: A roughly level rectangle, at least 4m × 11m (3m × 10m footprint plus 0.5m workspace on each side).
- People: 2–3 (the tall arches are at the limit of two-person handling — a third person on raising day helps).
- Tools: Drawknife or machete, shovel, wire cutters, tape measure, spirit level, scissors or utility knife, a sturdy stepladder (≥3m).
- Time: ~1 week of pole prep (Regenerative Default) or 2 weeks (Extended-Life Protocol with borax soak), then 3 days of building.
Before the Build Weekend
Section titled “Before the Build Weekend”Pole preparation for this design uses the Regenerative Default protocol — char + linseed oil, no borax. See the Treatment Guide for the full reasoning. In short: the Gothic Arch is a plastic-skinned greenhouse on a 3–4 year re-skin cycle, and the pole frame is fully accessible, so a 15–20 year pole life from charring alone is the right trade — chemical-free, faster prep, simpler workflow.
If you’re building in a high-pest area (lower elevation, coastal Portugal) or you want to push past 20 years before any pole maintenance, follow the Extended-Life Protocol in the Treatment Guide instead — that adds a 5-day borax soak between charring and bending.
-
Harvest poles
Tall arches need long, stiff poles. Select older eucalyptus (8–12 years) with straighter, larger trunks than the younger 5–8-year material that bends easily into wattle work.
- Arch poles: 14 (12 + 2 spares), 9–11cm butt diameter, ~8m length, E. globulus — the longest, stiffest poles you have.
- Ridge poles: 4 (two per side, overlapped), 7–9cm diameter, ~5.5m length each.
- Purlin poles: 12 (two per run × 6 runs), 5–7cm diameter, ~5.5m length each.
- Gable poles: ~12, 5–8cm diameter, 1.5–4m length (gables are big triangles — you’ll need a few long pieces).
- Door posts: 4 (2 per gable), 9–11cm diameter, ~2.4m length.
-
Debark within 48 hours. Bark left on traps moisture and accelerates rot. Strip with a drawknife or flat-blade scraper, butt to thin end.
-
Char the bases (8–10mm depth). Torch the bottom 50cm of every arch pole until the char layer reaches 8–10mm depth — you should see alligator-scale cracking. Brush off loose char with a stiff wire brush. This carbonised zone is your primary defence in the buried section, where rot would otherwise begin. See the Treatment Guide for the deep-char technique. Fire-season build? You can’t do this step — switch to the No-Burn Foot (Protocol C).
-
Score arch poles for bending. Score the upper half of each pole with shallow cuts every 10cm on the outer face (the face that ends up on the outside of the curve). The bending zone is concentrated in the top third where the pole curves in toward the apex.
-
Sort and pair. Sort all 14 arch poles by butt diameter. Pair them so each arch has two poles of similar size (6 working pairs + 1 spare pair). Both butts in each pair sit at ground level — one in the left row, one in the right — so taper matching across the apex matters for a balanced apex crossing.
-
(Optional) Borax soak — 5 days. Skip this step if you’re using the Regenerative Default. If you’ve decided on the Extended-Life Protocol, do the borax soak now (after charring, before bending). Long arch poles benefit from 5 days rather than the standard 72 hours — they carry more load and are exposed for longer. Going in after charring matters: the heat-opened cellular structure of the charred zone receives the borax at depth.
Day 1 — Foundation
Section titled “Day 1 — Foundation”Two parallel rows of gravel-filled postholes — six holes per row, 2m apart along the length, 3m apart across the width. Postholes go 40cm deep (10cm deeper than the standard greenhouse) because the long arches put more uplift load on the bases.
-
Mark the rectangle
Drive corner stakes at the four corners of a 3m × 10m rectangle. Check the diagonals — both should measure 10.44m. Adjust until matched.
-
Mark posthole positions
Run two strings between the corner stakes along the long sides. Mark each string at 0m, 2m, 4m, 6m, 8m, and 10m. You now have 12 posthole positions, 6 in each row.

Foundation plan: 12 postholes in two parallel rows (3m apart, 2m on-centre over a 10m length), with gable doors at both ends -
Dig postholes
Each hole: 40cm deep, 25cm wide. The taller arches transmit more horizontal kick at the base, so deeper, slightly wider holes give a better grip. If your soil is very clay-heavy or waterlogged, go 50cm deep with an extra 15cm of gravel at the bottom.
-
Fill with gravel
Drop a flat stone at the bottom of each hole, then fill with 20cm of gravel or crushed stone. The pole butt sits on this bed; more gravel packs around it after the frame goes up.
-
Install gable door frames
At each gable end, set two vertical 9–11cm posts (~2.2m above ground + 50cm buried) into postholes 80cm apart, centred on the gable axis. Pack firmly with gravel. Lash a horizontal crosspiece at ~2.1m height between them with galvanized wire.
-
Drive ground stakes
At each of the 12 arch postholes, drive a 80cm rebar or hardwood stake vertically into the ground, 25cm outside the row. The longer stakes are needed because of the bigger uplift loads on the tall arches.
Day 2 — Frame, Twin Ridges, and Purlins
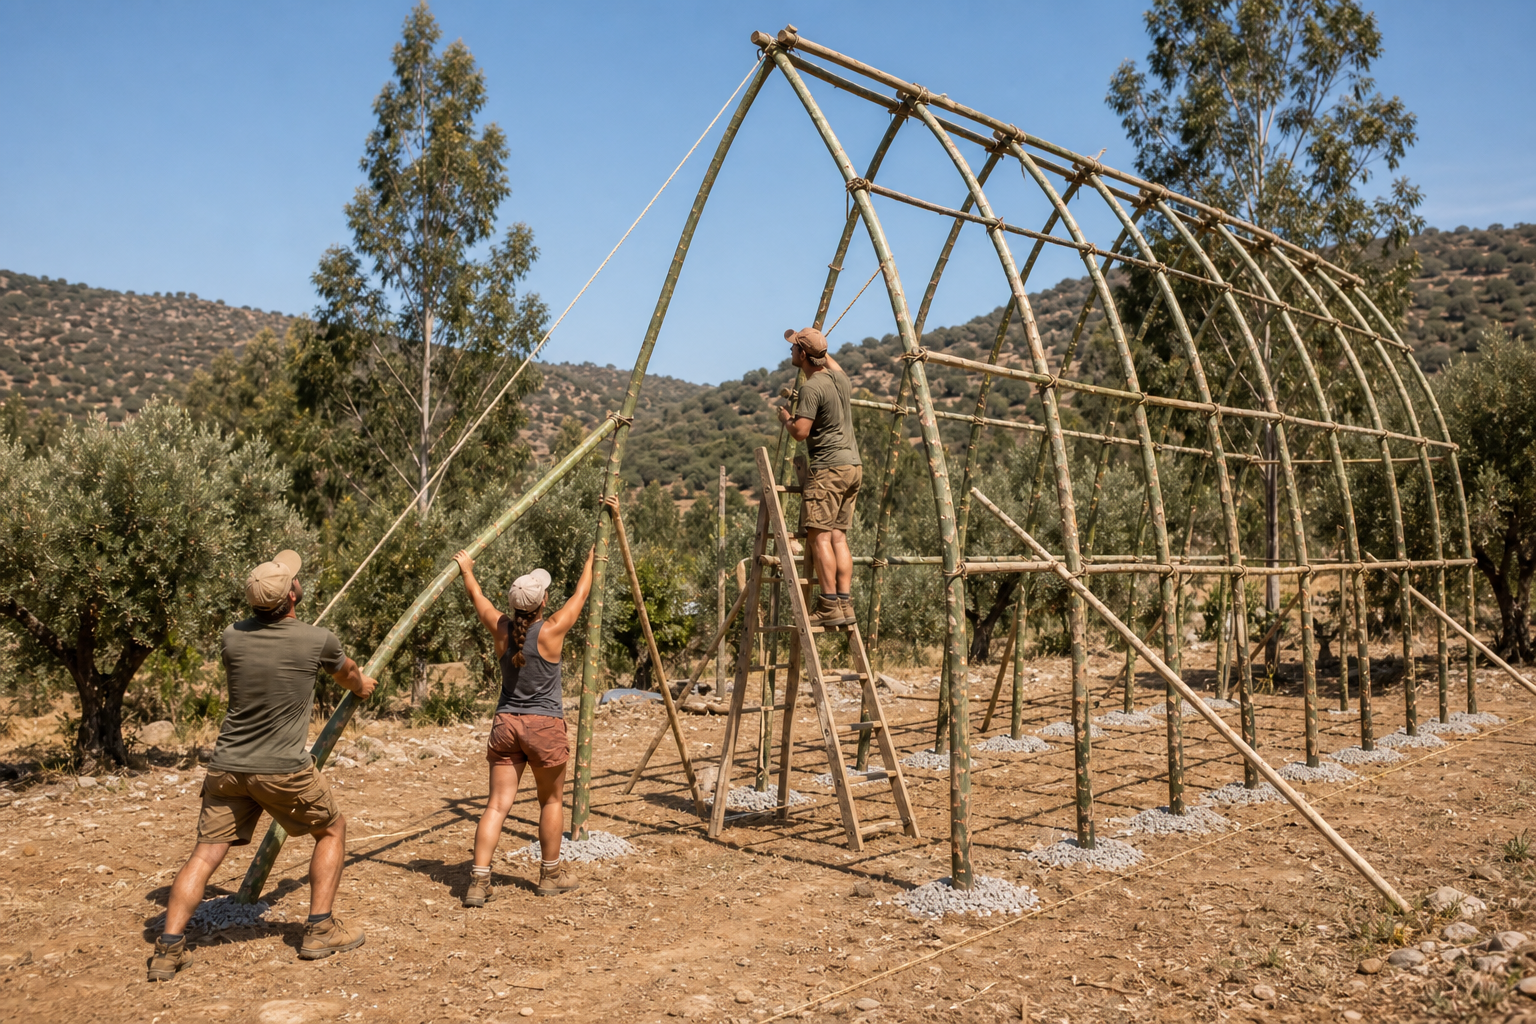
Section titled “Day 2 — Frame, Twin Ridges, and Purlins”The most physically demanding day in the whole build. The arches are 8m long and reach to 6.5m at the apex — you’ll be on a stepladder. Plan a full day with a third person to help raise and stabilise each arch.
Raising the Tall Gothic Arches
Section titled “Raising the Tall Gothic Arches”Each arch is two poles. Each pole’s butt sits in a posthole on one side; its thin end rises ~1m vertically, then bends sharply inward and upward, meeting its partner at the apex 6.5m above the ground. The two poles cross and overlap by 30–40cm at the apex.


-
First arch (one gable end)
Take Pair 1’s first pole. Set its butt into the corner posthole on the left row. Three people walk it up: two pushing it vertical from the base while a third pulls the thin end up with a rope. Once vertical, slowly bend it inward toward the centreline — the pole flexes most in its top third.
Take Pair 1’s second pole. Set its butt into the matching posthole on the right row. Walk it up the same way and bend it toward the first pole. The two thin ends should meet at the apex roughly 6.5m above the centreline of the rectangle, overlapping by 30–40cm.
Lash the overlap tightly with galvanized wire — at least four full wraps. Brace the arch with two diagonal props (any straight pole 4m+ long) wedged from the ground up to each side of the arch at the wall–curve transition (~1m up). Without bracing, a single tall arch is unstable.
-
Second arch (next station)
Move 2m down the tunnel and raise Pair 2 the same way. Now you have two parallel gothic arches, 2m apart. Still wobbly along the length until the ridges go on.
-
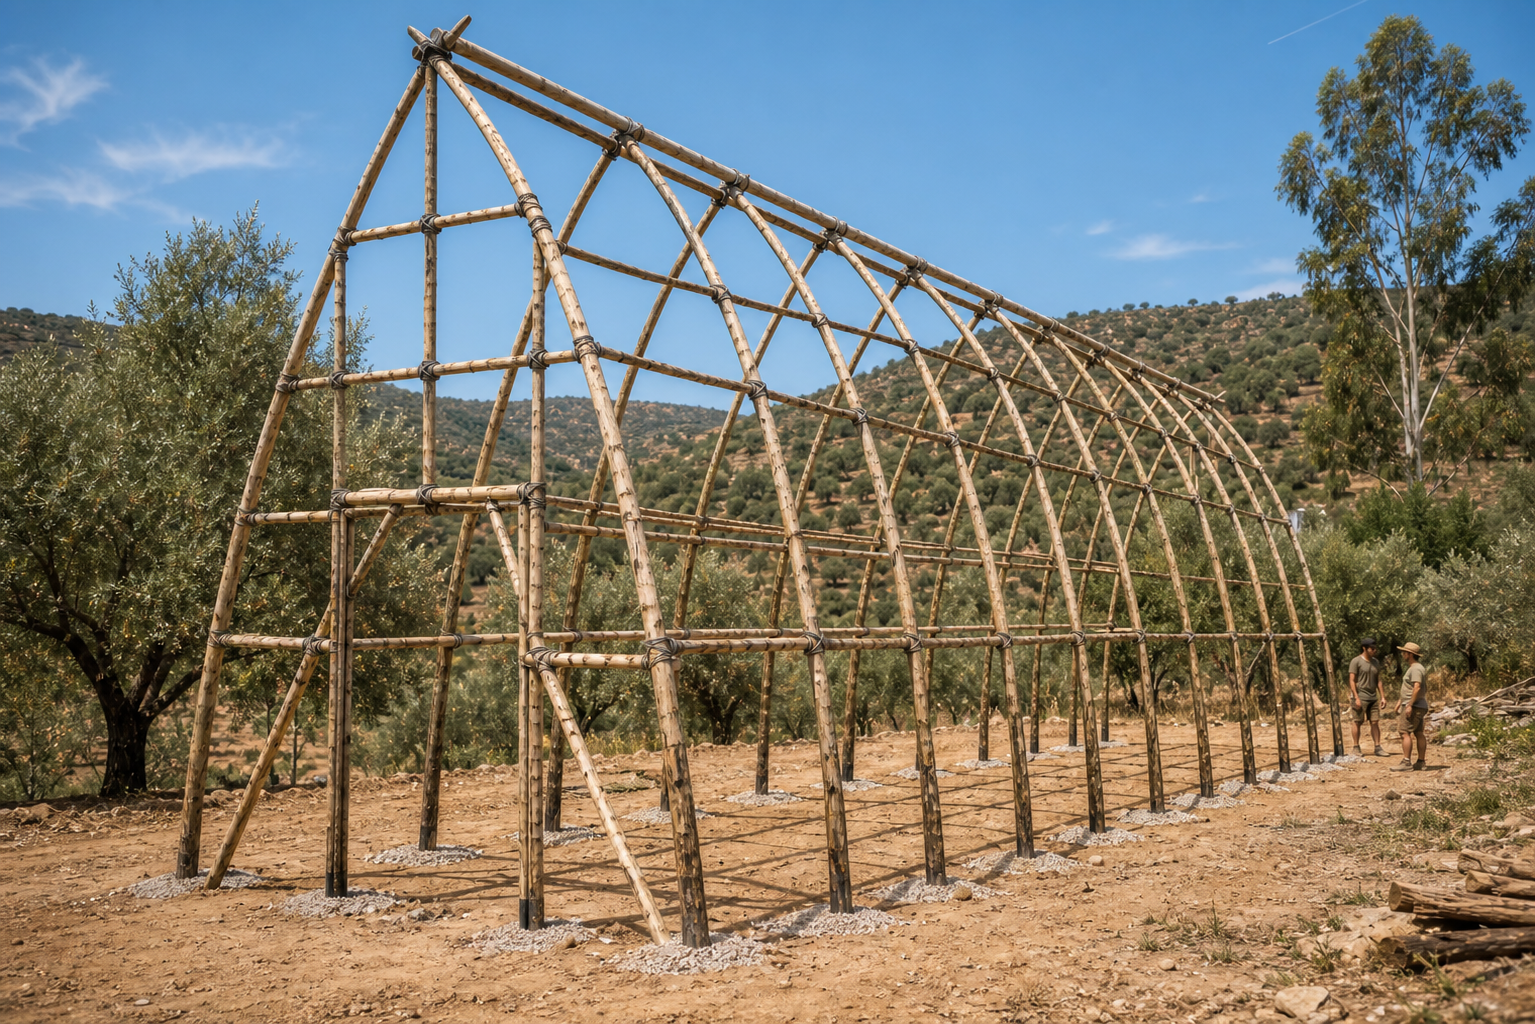
Set the first pair of ridge poles
This design uses two parallel ridge poles, ~30cm apart, one for each side of the apex. The gap between them becomes the continuous ridge vent.
Lift the first ridge pole (5.5m long, 7–9cm diameter) up onto the left/west side of the apex crossings of Arches 1 and 2. The pole sits in the V on that side, ~30cm before the very top. Lash it to each apex crossing with galvanized wire.
Lift the second ridge pole the same way, but onto the right/east side, ~30cm past the apex crossing. The two ridge poles are now parallel along the apex, separated by ~30cm of vertical gap.
Lash both poles tightly. This twin-ridge assembly turns the two arches into a stable triangle along the length. You can remove the temporary diagonal props.
-
Remaining four arches
Raise Arches 3, 4, 5, and 6 at 2m spacing along the rest of the tunnel. After each new arch, lash both apex crossings to both ridge poles. Once the first set of ridge poles runs out (after about Arch 4), set the second pair, overlapping by ~50cm. Lash the overlaps and continue to Arch 6.
-
Trim and cap the ridges
Trim both ridge poles flush with the gable ends. Both ridges should now span the full 10m length, locked to all 6 arch crossings.
-
Lock pole bases
Pack more gravel tightly around each pole butt in its posthole. Wire-lash each pole to its adjacent ground stake — use 4mm wire (heavier than the dome’s 3mm) given the bigger uplift loads. Wrap the bottom 50cm of each pole in a plastic bag before packing the final gravel.
Longitudinal Purlins
Section titled “Longitudinal Purlins”Three purlins per side, lashed to the outside of each arch — one at hip height (~1m), one at shoulder height (~2m), and one near apex height (~4.5m). For a tunnel this tall the upper purlin is genuinely high; a stepladder is required.

-
Cut purlin poles fresh
You need 12 purlin poles total — two per run, six runs. Each run spans the full 10m length as two ~5.5m poles overlapped 30cm at the join.
-
Install purlins, lowest first
Starting on one side at hip height (~1m above ground), hold a purlin pole horizontally against the outside face of all 6 arches and lash with galvanized wire at each crossing. Where the purlin runs out, overlap the next pole by 30cm and double-lash the join.
-
Repeat at shoulder and near-apex heights
Install the second purlin at ~2m and the third at ~4.5m (under the apex curve). Mirror everything on the other side.
-
Check rigidity
Push on the structure from the side. It should flex slightly but not rack. Tall narrow tunnels are inherently more wind-sensitive than dome shapes, so over-engineer rather than under.
Gable End Framing
Section titled “Gable End Framing”Gables for a 6.5m-tall tunnel are large triangles — about 14m² each. You can’t span them with a few diagonals; you need a small framework.

-
Door frame (already done on Day 1)
Door posts are already standing, with their lintel at ~2.1m. Confirm plumb and lashed tight to the gable arch where they cross it.
-
Vertical infill above the door
Cut a vertical pole (5–7cm diameter, 4–4.5m long) and lash it from the centre of the door lintel up to the apex. This divides the gable above the door into two narrow bays — much easier to clad.
-
Diagonal infill on each side
Cut two diagonal poles (5–7cm diameter, ~2.5m long) per gable. Lash one from the top of each door post up to the gable arch where it begins to curve. This divides each side of the gable into two bays.
-
Repeat at the other gable.
Day 3 — Plastic and Ridge Vent
Section titled “Day 3 — Plastic and Ridge Vent”Materials
Section titled “Materials”- Two main plastic sheets: each 8m × 10m, 150μm UV-stabilised polyethylene. The whole tunnel is sized around two such sheets — one per slope.
- Vent cap sheet: 1m × 11m strip (cut from offcuts or a third small sheet). This is the hinged cap that covers the ridge vent gap.
- Gable cladding: ~28m² total (two ~14m² triangles, with margin). UV PE, shade cloth, or scrap tarp.
- Greenhouse repair tape: 2 rolls.
- Twine or poly rope: ~150m.
- Split-pole battens: ~30 pieces, 2–3cm thick × 1–1.5m long.
Covering the Tunnel
Section titled “Covering the Tunnel”-
Identify slope sides
Number the two slopes “west” (left) and “east” (right). Each will get one full 8m × 10m sheet.
-
Drape the west sheet
Choose a calm day. Roll out the first 8m × 10m sheet on flat ground next to the west side of the tunnel, with the 10m direction parallel to the tunnel length and the 8m direction running across the curve. With one person at each end of the sheet, lift the long upper edge up to the west ridge pole. Drape the sheet down the slope so the lower edge reaches the ground with ~50cm of slack.
Wrap the upper edge over the west ridge pole — fold the top 30cm of plastic over the pole, back onto itself. Lash this fold to the ridge pole every 50cm with twine, so the plastic is clamped between itself and the pole. The plastic is now anchored at the top.

Twin-sheet drape: each sheet covers one slope, lashed to its own ridge pole. The 30cm gap between ridges is the ridge vent, covered by a hinged vent cap. -
Drape the east sheet
Repeat on the east side with the second sheet, lashing the upper edge to the east ridge pole. The two sheets now both anchor at the apex but don’t touch — there’s a continuous ~30cm vertical gap between them.
-
Lash to purlins (sandwich method)
At each of the 6 purlin lines (3 per side), lay a split-pole batten over the plastic on the outside, pressing it against the purlin underneath. Lash the batten to the purlin with twine. Same technique as the dome greenhouse — see the batten sandwich detail for the cross-section.
-
Anchor the long base edges
Use the roll-up method (highly recommended for a tunnel this tall — sealed-base tunnels overheat fast). Wrap each base edge of plastic around a long thin pole (a 5m batten works), then weight the pole on the ground with stones. Lift and roll up to ventilate; drop and weight to seal.
-
Install the ridge vent cap
Take the vent cap sheet (1m × 11m). Lash one long edge to the west ridge pole along its full length, on top of the west sheet’s clamped fold. The cap now hangs over the top of the structure, draping past both ridge poles down the east side.
The cap should be wide enough to lap onto the east sheet by ~20cm. To close the vent, weight the loose edge of the cap onto the east sheet (small stones or tied stones in the fold). The cap sits flat across the apex and seals the gap.
To open the vent, prop the cap up with 30–50cm sticks at intervals along the length. The cap lifts to create a continuous slot vent — hot air escapes upward and out.

Ridge vent operation: cap propped open creates a continuous 10m slot vent. Hot air rises and exits through the gap; cool air is drawn in low through the doors and roll-up walls. Stack effect through 6.5m of vertical height pulls strongly even on still days. -
Cover the gables
Cut two pieces of cladding to cover each gable triangle with 20cm extra all around. Position against the gable. Tape the top edges along the gable arch line, and where the cladding meets the main sheets, run a continuous strip of greenhouse repair tape on the inside of the seam. Trim the bottom edge to ground level.
-
Frame the doors
At each door opening, fold the cut plastic edges over and tape to themselves for reinforcement. Make a door flap 20cm wider than the opening and 20cm taller. Tape or lash across the top of the door frame so it hangs as a curtain. Weight the bottom edge with a thin pole sewn into a fold.
Ventilation Modes
Section titled “Ventilation Modes”
The ridge vent + roll-up walls + gable doors give you three distinct climate modes:
- Sealed (winter): Vent cap weighted shut. Roll-up walls down. Doors closed. Tunnel acts as a passive solar greenhouse — captures and holds heat.
- Mild (spring/autumn): Vent cap propped open along its full length. Roll-up walls up to first purlin (~1m). One or both doors open. Strong stack effect pulls cool air in low and pushes hot air out high.
- Hot (peak summer): Vent cap fully open. Roll-up walls fully raised on both sides (you’ll have a near-open structure at ground level). Both doors open. The tunnel becomes essentially a shade structure with overhead roof — protects from direct sun while letting tropical-style heat dissipate.
Bill of Materials
Section titled “Bill of Materials”| Item | Qty | Specs | Est. Cost |
|---|---|---|---|
| Eucalyptus arch poles | 14 (12 + 2 spares) | 9–11cm dia, ~8m, green | €0–60 |
| Eucalyptus ridge poles | 4 (2 per side) | 7–9cm dia, ~5.5m, green | €0–25 |
| Eucalyptus purlin poles | 12 | 5–7cm dia, ~5.5m, green | €0–30 |
| Gable infill poles | ~12 | 5–8cm dia, 1.5–4m, green | €0–25 |
| Door frame posts | 4 | 9–11cm dia, ~2.4m, treated | €0–20 |
| Linseed oil (raw) | 2L | For above-ground sealing | €15–30 |
| Borax + boric acid (optional) | 18kg | Technical grade — Extended-Life Protocol only | €0 / €25–40 |
| Gravel / crushed stone | 0.6m³ | For postholes | €18–35 |
| Main plastic sheets | 2 | 8m × 10m, 150μm UV PE | €0 (existing) |
| Vent cap | 1 | 1m × 11m strip, UV PE | €5–15 |
| Gable cladding | ~28m² | UV plastic, shade cloth, or scrap | €15–60 |
| Greenhouse repair tape | 2 rolls | UV-resistant poly tape | €18–25 |
| Galvanized wire | 100m | 4mm diameter | €55–70 |
| Twine / poly rope | 150m | UV-resistant preferred | €15–25 |
| Ground stakes | 12 | 80cm rebar or hardwood | €18–35 |
| Roll-up battens | 2 | 5m thin pole, side ventilation | €0–10 |
| Total (Regenerative Default) | €159–445 | ||
| Total (Extended-Life Protocol) | €184–485 |
Maintenance
Section titled “Maintenance”Weekly during summer: Check the ridge vent cap. Storms can shift it, hail can puncture it. The cap is the most exposed plastic component — plan to replace it every 2 years.
Monthly: Walk the perimeter. Check long-edge anchoring, batten lashings, and base wire-lashes. Tall arches accumulate small movements over time — anything loose should be re-lashed before it rubs through plastic.
Seasonally: Before winter storms, check all wire lashings at the apex crossings, twin-ridge attachments, and pole bases. Tighten anything loose. The tall arches catch more wind than a low dome — a single failed apex lashing can cascade.
Every 3–4 years: Replace both main plastic sheets and the vent cap. UV-stabilised plastic lasts 3–4 years in Portuguese sun. Replacement is a 2-person, full day job — strip old plastic, drape new sheets, re-lash everything.
Every 5–10 years: Reapply hot linseed oil to all above-ground pole surfaces (60–70°C, brushed on). This is the substitute for skipping the borax soak in the Regenerative Default protocol — don’t let it lapse. The plastic re-skin years are a natural moment to do this: the frame is fully exposed.
What’s Next — Climate, Trees, and Trellising
Section titled “What’s Next — Climate, Trees, and Trellising”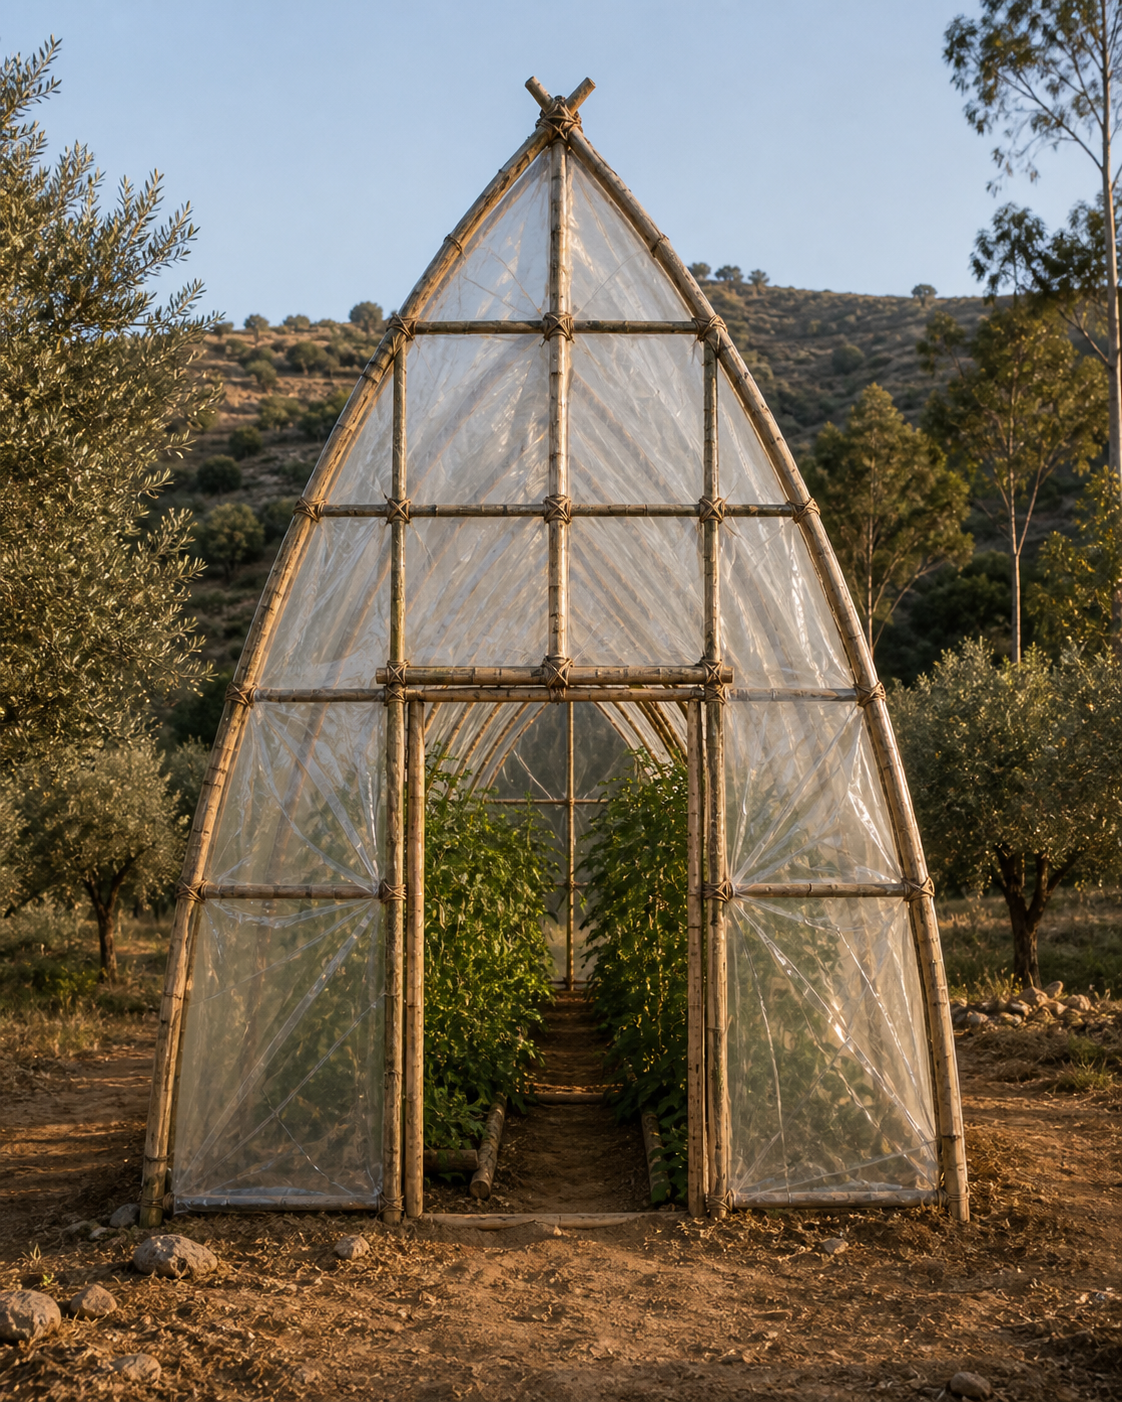
The tall apex changes what you can grow:
- Citrus: Semi-dwarf grapefruit, mandarin, lemon, lime — all comfortable, with annual pruning. Standard rootstocks will outgrow the 6.5m height after several years.
- Banana: Dwarf cultivars (Dwarf Cavendish, 2–3m) thrive. Standard banana (4–5m) just fits.
- Papaya: Both dwarf and standard cultivars. Papaya naturally fruits at 2–4m, ideal for this height.
- Climbing vines: Run wires from one side’s high purlin across to the other side’s high purlin to create a 4–5m trellis at the apex zone. Passion fruit, kiwi, dragon fruit, climbing tomatoes all work.
- Layered planting: Tall trees down the centre, medium fruit (citrus, fig) along the sides, ground crops (greens, herbs, strawberries) at the wall edge. Three productive zones in 30m².